building a chef environment with vagrant
This post will describes how to install a CHEF environment with Vagrant.
introduction
CHEF is an system and infrastructure automation framework. It allows to define how is configured a server or an infrastructure based on recipes which are scripts written with a ruby base DSL(domain specific language) to configure an element and cookbooks(ensemble of recipes).
Vagrant allows to provision easily and automatically VMs(called boxes in vagrant terminology). Here it will use VirtualBox in background but it has plugins for a lot of others solutions(vmware fusion, docker, …)
My initial idea was to publish a post to show an Openstack installation through CHEF.Installing manually OpenStack is very instructive and OpenStack has the best documentation i have seen for a product of this size but it’s a lenghty process. And hard to reproduce quickly for someone interested.
But covering CHEF, Vagrant and Openstack in the same post seems too much. So in this one, i will only cover the chef setup configuration. In the next post, i will show how to deploy Openstack by using this setup.
All the steps was done on a fedora 20 host.
target setup
I want to create two boxes. One will be my chef server, the other one will serve as my chef workstation.
Here a chart describing my configuration :
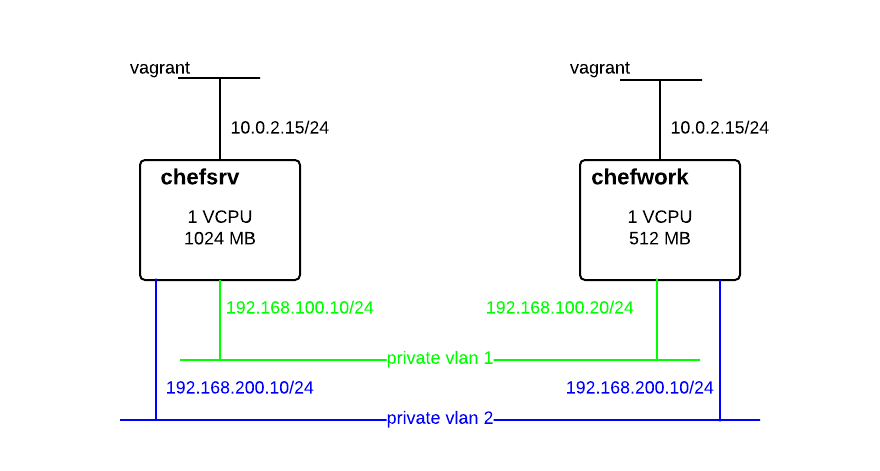
Technically, i could do all the operations directly on the chef server but i wanted to have a more “realistic” environment where cookbook development and configuration will be done on a dedicated chef workstation. It allowed me to test also chefdk (chef development kit).
vagrant installation
You can download the latest version from Vagrant website.
[adejoux@feddy ~]$ wget https://dl.bintray.com/mitchellh/vagrant/vagrant_1.6.5_x86_64.rpmInstall the package :
[adejoux@feddy ~]$ sudo yum localinstall -y vagrant_1.6.5_x86_64.rpminstall virtualbox(it’s by default in fedora repo) :
[adejoux@feddy ~]$ sudo yum install -y VirtualBoxThat’s all. Pretty easy :)
Vagrant configuration
To configure an environment, create a directory :
[adejoux@feddy ~]$ mkdir -p ~/vagrant/chef
[adejoux@feddy ~]$ cd ~/vagrant/chef
Vagrant is working with a configuration file named Vagrantfile.
You can generate a default configuration file with :
[adejoux@feddy ~]$ vagrant init .
A `Vagrantfile` has been placed in this directory. You are now
ready to `vagrant up` your first virtual environment! Please read
the comments in the Vagrantfile as well as documentation on
`vagrantup.com` for more information on using Vagrant.
Here a will describe my customised configuration file available here. It’s based on the one made by Thornelabs to deploy RackSpace.
first we define a script which will set root password and configure /etc/hosts on the boxes :
$script = <<SCRIPT
echo root:password | chpasswd

cat << EOF > /etc/hosts
127.0.0.1 localhost localhost.localdomain localhost4 localhost4.localdomain4
::1 localhost localhost.localdomain localhost6 localhost6.localdomain6
192.168.100.10 chefsrv
192.168.100.20 chefwork
EOF
SCRIPT
This line start the environment configuration(it’s a standard ruby block) :
Vagrant.configure(VAGRANTFILE_API_VERSION) do |config|I choose to use a standard box containing a centos 6.5 from the public vagrant boxes repository
config.vm.box = "chef/centos-6.5"Here is the box customization section :
  config.vm.define "chefsrv" do |chefsrv_config|
    chefsrv_config.vm.hostname = "chefsrv"

    chefsrv_config.vm.provision "shell", inline: $script

    # eth1
    chefsrv_config.vm.network "private_network", ip: "192.168.100.10"
    # eth2
    chefsrv_config.vm.network "private_network", ip: "192.168.200.10"

    chefsrv_config.vm.provider "virtualbox" do |v|
        v.customize ["modifyvm", :id, "--memory", "1024"]
        v.customize ["modifyvm", :id, "--cpus", "1"]
    end
  end
Some explanations :
- chefsrv_config.vm.hostname : define box hostname
- chefsrv_config.vm.provision “shell”, inline: $script will execute the script we defined previously.
- chefsrv_config.vm.network “private_network”, ip: “192.168.100.10 define a vagrant private vlan. Ip here only accessible from the fedora host but not from outside.
The section below will tell to VirtualBox to create a vm with 1GB of memory and 1 vcpu :
    chefsrv_config.vm.provider "virtualbox" do |v|
        v.customize ["modifyvm", :id, "--memory", "1024"]
        v.customize ["modifyvm", :id, "--cpus", "1"]
    end
After that the only thing to do is to run vagrant up to have the boxes provisioned(only chefsrv is shown below) :
[adejoux@feddy ~]$ vagrant up
Bringing machine 'chefsrv' up with 'virtualbox' provider...
==> chefsrv: Checking if box 'chef/centos-6.5' is up to date...
==> chefsrv: Clearing any previously set forwarded ports...
==> chefsrv: Clearing any previously set network interfaces...
==> chefsrv: Preparing network interfaces based on configuration...
    chefsrv: Adapter 1: nat
    chefsrv: Adapter 2: hostonly
    chefsrv: Adapter 3: hostonly
==> chefsrv: Forwarding ports...
    chefsrv: 22 => 2222 (adapter 1)
==> chefsrv: Running 'pre-boot' VM customizations...
==> chefsrv: Booting VM...
==> chefsrv: Waiting for machine to boot. This may take a few minutes...
    chefsrv: SSH address: 127.0.0.1:2222
    chefsrv: SSH username: vagrant
    chefsrv: SSH auth method: private key
    chefsrv: Warning: Connection timeout. Retrying...
    chefsrv: Warning: Remote connection disconnect. Retrying...
    chefsrv: Warning: Remote connection disconnect. Retrying...
==> chefsrv: Machine booted and ready!
==> chefsrv: Checking for guest additions in VM...
==> chefsrv: Setting hostname...
==> chefsrv: Configuring and enabling network interfaces...
==> chefsrv: Machine already provisioned. Run `vagrant provision` or use the `--provision`
==> chefsrv: to force provisioning. Provisioners marked to run always will still run.
install chef server
All operations are done on chefsrv vm. To connect on it we use vagrant ssh :
vagrant ssh chefsrvConnect under root(password is set in the Vagrantfile) and install git :
yum install -y gitTo install chef server i followed the very good instructions from Deploy Rackspace Private Cloud v4.2.x powered by OpenStack Havana with Neutron Networking Using VirtualBox or VMware Fusion and Vagrant.
The script simplify the installation :
[root@chefsrv ~]# curl -O https://raw.githubusercontent.com/rcbops/support-tools/master/chef-install/install-chef-server.sh
  % Total % Received % Xferd Average Speed Time Time Time Current
                                 Dload Upload Total Spent Left Speed
100 5026 100 5026 0 0 11202 0 --:--:-- --:--:-- --:--:-- 32012
[root@chefsrv ~]# chmod +x install-chef-server.sh
[root@chefsrv ~]# export CHEF_URL="https://chefsrv:443"
[root@chefsrv ~]# ./install-chef-server.sh
After that, we should have a working chef server. The best way to test that is to try the dashboard : http://192.168.100.10
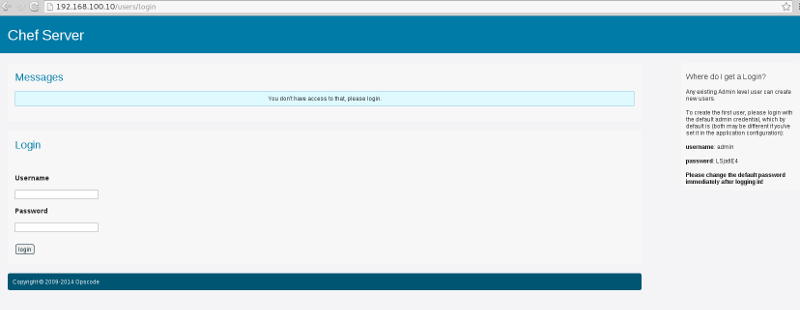
The first step is to change the admin password. The current password is shown on the right panel.
All should be working correctly. And it’s done for the chef server part :)
install chef workstation
Connect on the chefwork box :
vagrant ssh chefworkUnder root user, install vim and git :
yum install -y git vimTo manage chef administration the best solution seems to install chefdk. This development kit bundle a lot of chef dependencies and give a coherent environment for adminsitration and cookbooks development.
The instructions to install chefdk are here : http://docs.getchef.com/install_dk.html
Here the installation steps from command line :
# wget https://opscode-omnibus-packages.s3.amazonaws.com/el/6/x86_64/chefdk-0.2.1-1.el6.x86_64.rpm
# yum localinstall -y chefdk-0.2.1-1.el6.x86_64.rpm

# chef verify
Running verification for component 'berkshelf'
Running verification for component 'test-kitchen'
Running verification for component 'chef-client'
Running verification for component 'chef-dk'
Running verification for component 'chefspec'
....................
---------------------------------------------
Verification of component 'berkshelf' succeeded.
Verification of component 'chefspec' succeeded.
Verification of component 'chef-client' succeeded.
Verification of component 'chef-dk' succeeded.
Verification of component 'test-kitchen' succeeded.
knife
knife is the command line tool to interact with CHEF.
First we will start by getting a default chef repository :
[root@chefwork ~]# git clone https://github.com/opscode/chef-repo.git
Initialized empty Git repository in /root/chef-repo/.git/
remote: Counting objects: 225, done.
remote: Total 225 (delta 0), reused 0 (delta 0)
Receiving objects: 100% (225/225), 46.12 KiB, done.
Resolving deltas: 100% (58/58), done.
It’s possible to configure knife at directory level. So by changing of directory you can interact with different chef servers. You only need to create a .chef directory in your project directory.
But here i want to build a test environment with only one chef server so to make it simpler i will put .chef in the home directory.
I could use the root user, this box being dedicated to chef. but it’s better to follow best practices and create a dedicated user :
[root@chefwork]# useradd -m chefchef user box will be dedicated to managing chef so i configure it to use directly chefdk embedded binaries :
[chef@chefwork ~]$ echo 'eval "$(chef shell-init bash)"' >> ~/.bash_profile
[chef@chefwork ~]$ source ~/.bash_profile
[chef@chefwork ~]$ which ruby
/opt/chefdk/embedded/bin/ruby
[chef@chefwork ~]$ ruby --version
ruby 2.1.1p76 (2014-02-24 revision 45161) [x86_64-linux]
All the following steps are done with chef user.
[chef@chefwork ~]$ mkdir ~/.chefNow we need to get the private keys for the client validator and to create a dedicated user in chef server.
On chef server dashboard, go on clients,select chef-validator, choose edit and select **Regenerate Private Key **:

Copy it for chef@chefwork and root@chefsrv(the private key is changed):
[chef@chefwork ~]$ vi ~/.chef/chef-validator.pem
[root@chefsrv ~]# vi ~/.chef/chef-validator.pem
Now go on users, choose create and generate the admin user chefwork :
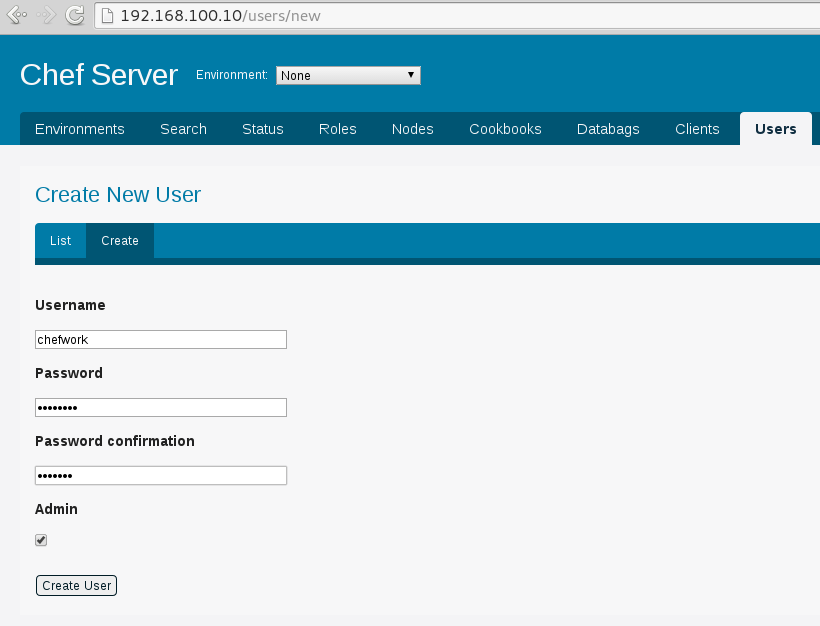
Copy the key to clipboard :
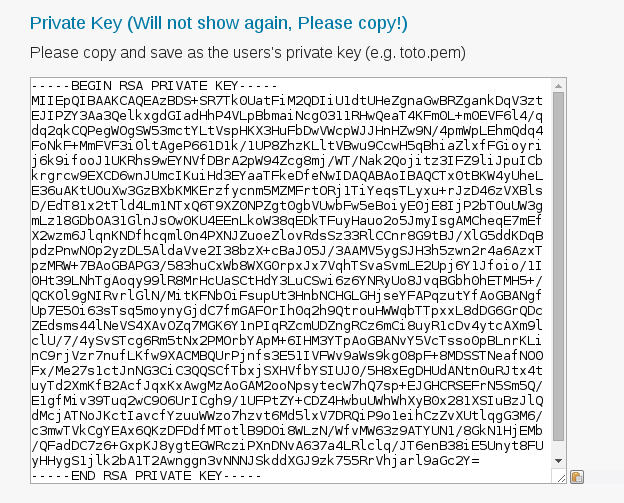
And copy it for chef@chefwork :
[chef@chefwork ~]$ vi ~/.chef/chefwork.pemNow we will configure knife :
knife configure
WARNING: No knife configuration file found
Where should I put the config file? [/home/chef/.chef/knife.rb]
Please enter the chef server URL: [https://chefwork:443] https://chefsrv:443
Please enter an existing username or clientname for the API: [vagrant] chefwork
Please enter the validation clientname: [chef-validator]
Please enter the location of the validation key: [/etc/chef-server/chef-validator.pem] /root/.chef/chef-validator.pem
Please enter the path to a chef repository (or leave blank): /root/chef-repo
*****

You must place your client key in:
  /home/chef/.chef/chefwork.pem
Before running commands with Knife!

*****

You must place your validation key in:
  /home/chef/.chef/chef-validator.pem
Before generating instance data with Knife!

*****
Configuration file written to /root/.chef/knife.rb
We validate if knife is working by using a standard command :
[chef@chefwork ~]$ knife client list
chef-validator
chef-webui
We should see this entries at least.
tips
With Vagrant, you can also match box names by adding a expression between “/”. A example below :
vagrant destroy /chefwor/
vagrant up /chefwor/
No need to specify the complete name. If i wanted to destroy both chef servers, i could do vagrant destroy /chef/.
Conclusion
I finish this post with what i hope to be a working CHEF environment under Vagrant.
I didn’t show it during this post but a great feature of Vagrant is to be able to destroy and rebuild a box when something go wrong. No need to be afraid, you botch something you run vagrant destroy followed by vagrant up and you can restart it. Coupled with VirtualBox snapshots features and CHEF cookbooks, it’s becoming enjoyable to test configurations.
The next post will show how i used CHEF to deploy OpenStack in a multi-node configuration.