nginx client certificate authentication
I had some difficulty to setup an authentication mechanism for Graylog with NGINX. I finally used a certificate authentication. I will describe how I setup this configuration.
My problem
I am currently evaluating Graylog for centralized log analysis. So far, it seems really good. My only problem was I wanted to setup it behind a NGINX reverse proxy. I don’t like to have this kind of tools directly accessible.
Normally I setup a basic authentication like the one below in my virtual host:
  location / {
    auth_basic "Restricted";
    auth_basic_user_file htpasswd;
    proxy_set_header        Host $host;
    proxy_set_header        X-Real-IP $remote_addr;
    proxy_set_header        X-Forwarded-For $proxy_add_x_forwarded_for;
    proxy_set_header        X-Forwarded-Proto $scheme;
    proxy_pass         http://127.0.0.1:50000/;
}
It’s working well enough for me. But Graylog GUI is using the same Basic Authentication mechanism to talk with it REST API.
I tried some workaround found on Internet like removing the authentication header at proxy level:
proxy_set_header Authorization "";Or adding the credentials in the authorization header. Basically, it’s hardcoding the user and password in the NGINX configuration file. the format is user:password and it need to be base64 encoded.
proxy_set_header Authorization "Basic dXNlcjpwYXNzd29yZA==";But these solutions was not working(multiple authentication windows pop up) or was not satisfying(I don’t want to hard code user’s credentials in NGINX configuration).
It’s when I checked if it was possible to setup a client certificate authentication.
User certificate authentication
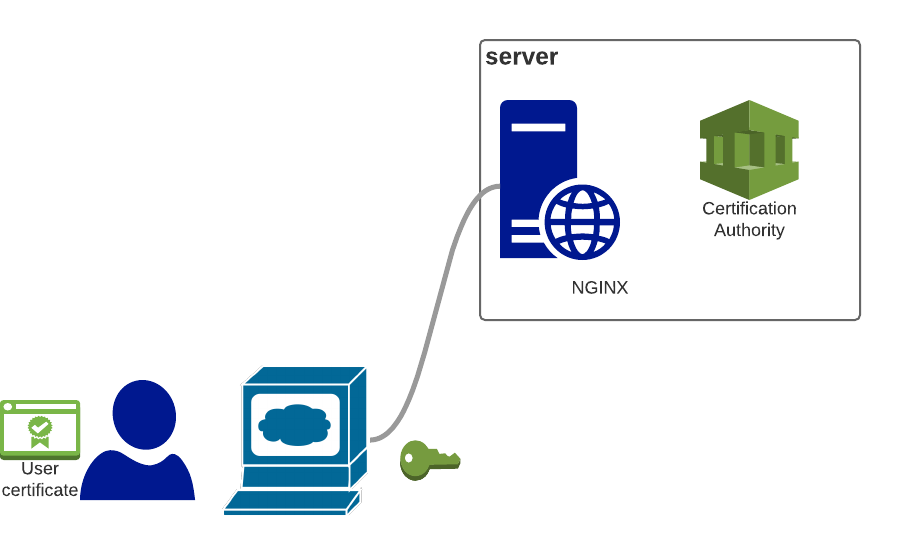
This authentication works by providing a certificate to the end user. This certificate will be used to authentify the user when he will connect on the web page.
It’s a pretty neat solution but to make it work a small Public Key Infrastructure need to be setup. At least a Certificate authority is needed to issue and sign the certificates. OpenSSL provides everything to manage a small self-signed PKI.
Certificate Authority
I will use openssl on Ubuntu 16.04 to create and manage my Certificate Authority.
It’s possible to store all files in the default directory /etc/ssl but I prefer to separate my CA from the standard system’s dorectory.
Here I create a directory to store the CA’s files:
mkdir -p /data/djouxtech/CAI also copy the original /etc/openssl.cnf file in this directory to know what was the configuration used when I created my certificates and keys.
cp /etc/ssl/openssl.cnf /data/djouxtech/CAThe section [CA-default] contains the directory structure and file names used by the different components of our CA.
[ CA_default ]

dir		= ./demoCA		# Where everything is kept
certs		= $dir/certs		# Where the issued certs are kept
crl_dir		= $dir/crl		# Where the issued crl are kept
database	= $dir/index.txt	# database index file.
#unique_subject	= no			# Set to 'no' to allow creation of
					# several ctificates with same subject.
new_certs_dir	= $dir/newcerts		# default place for new certs.

certificate	= $dir/cacert.pem 	# The CA certificate
serial		= $dir/serial 		# The current serial number
crlnumber	= $dir/crlnumber	# the current crl number
					# must be commented out to leave a V1 CRL
crl		= $dir/crl.pem 		# The current CRL
private_key	= $dir/private/cakey.pem# The private key
RANDFILE	= $dir/private/.rand	# private random number file

x509_extensions	= usr_cert		# The extentions to add to the cert

# Comment out the following two lines for the "traditional"
# (and highly broken) format.
name_opt 	= ca_default		# Subject Name options
cert_opt 	= ca_default		# Certificate field options

# Extension copying option: use with caution.
# copy_extensions = copy

# Extensions to add to a CRL. Note: Netscape communicator chokes on V2 CRLs
# so this is commented out by default to leave a V1 CRL.
# crlnumber must also be commented out to leave a V1 CRL.
# crl_extensions	= crl_ext

default_days	= 365			# how long to certify for
default_crl_days= 30			# how long before next CRL
default_md	= default		# use public key default MD
preserve	= no			# keep passed DN ordering

# A few difference way of specifying how similar the request should look
# For type CA, the listed attributes must be the same, and the optional
# and supplied fields are just that :-)
policy		= policy_match
The directory structure is defined by this variables:
dir		= ./demoCA		# Where everything is kept
certs		= $dir/certs		# Where the issued certs are kept
crl_dir		= $dir/crl		# Where the issued crl are kept
new_certs_dir	= $dir/newcerts		# default place for new certs.
private_key	= $dir/private/cakey.pem # The private key
RANDFILE	= $dir/private/.rand	# private random number file
It’s possible to change it but I will keep the same directory structure:
cd /data/djouxtech/CA
mkdir certs crl newcerts private
The Certificate Revocation List is defined by the crl variable:
crl = $dir/crl.pem # The current CRLWe have three special files:
database	= $dir/index.txt	# database index file.
serial		= $dir/serial 		# The current serial number
crlnumber	= $dir/crlnumber	# the current crl number
index.txt and serial need to be initialized:
touch index.txt
echo 01 > serial
echo 01 > crlnumber
Certification Authority
root key
The first elements of our CA are the root certificate and key files.
They are defined by this variables in the openssl.cnf configuration file:
certificate	= $dir/cacert.pem 	# The CA certificate
private_key	= $dir/private/cakey.pem # The private key
The first step is to create the CA root private key. It will be used to sign the root certificate and later the users certificate.
It need to be the one specified in the private_key parameter.
openssl genrsa -des3 -out /data/djouxtech/CA/private/cakey.pem 4096
Generating RSA private key, 4096 bit long modulus
.................................................................................................................................................++
............++
e is 65537 (0x10001)
Enter pass phrase for /data/djouxtech/CA/private/cakey.pem:
Verifying - Enter pass phrase for /data/djouxtech/CA/private/cakey.pem:
It’s the most critical file. It’s better to setup a good password here and change immediately the file permissions.
chmod 400 /data/djouxtech/CA/private/cakey.pemroot certificate
After that, we use this private key to generate the root certificate. Here it’s a small PKI and I don’t plan to spend time managing it. So I make this certificate valid for 10 years.
It’s here where I will specify the details about my organization. My Certificate Authority will be named djouxtech.net.
openssl req -new -x509 -key private/cakey.pem -out certs/cacert.pem -days 3650 -set_serial 0
Enter pass phrase for private/cakey.pem:
You are about to be asked to enter information that will be incorporated
into your certificate request.
What you are about to enter is what is called a Distinguished Name or a DN.
There are quite a few fields but you can leave some blank
For some fields there will be a default value,
If you enter '.', the field will be left blank.
-----
Country Name (2 letter code) [AU]:FR
State or Province Name (full name) [Some-State]:
Locality Name (eg, city) []:Paris
Organization Name (eg, company) [Internet Widgits Pty Ltd]:djouxtech.net
Organizational Unit Name (eg, section) []:
Common Name (e.g. server FQDN or YOUR name) []:djouxtech.net
Email Address []:admin@djouxtech.net
Certificate Revocation List
The last step is to create a Certificate Revocation List. It will maintain a list of all certificates revoked by this Certification Authority.
openssl ca -name CA_default -gencrl \
-keyfile /data/djouxtech/CA/private/cakey.pem \
-cert /data/djouxtech/CA/certs/cacert.pem \
-out /data/djouxtech/CA/crl/ca.crl \
-config /data/djouxtech/CA/openssl.cnf

Using configuration from /data/djouxtech/CA/openssl.cnf
Enter pass phrase for /data/djouxtech/CA/private/cakey.pem:
By default, the CRL will expires after 30 days. Depending on your environment, you can either recreate this CRL every 30 days or extend the expiration time by using the option crldays.
-crldays 300Or you can change the default value of default_crl_days in the configuration file.
Note: it’s important to use the same configuration file at all steps.
user certificate
Note: Technically it would be better to create intermediate certificate instead of signing directly with the root key and certificate. In this way it would be possible to put them completely offline. Here I don’t need this kind of additional security so I will skip this step.
User certificates will be stored in /data/djouxtech/certs/user:
mkdir /data/djouxtech/CA/certs/usersThe first steps are really similar to the creation of the root certificate and key. We also generate a key for our user(Here adejoux).
openssl genrsa -des3 -out /data/djouxtech/CA/certs/users/adejoux.key 1024 -config /data/djouxtech/CA/openssl.cnf
Generating RSA private key, 1024 bit long modulus
...................................................................++++++
......................................++++++
e is 65537 (0x10001)
Enter pass phrase for /data/djouxtech/CA/certs/users/adejoux.key:
Verifying - Enter pass phrase for /data/djouxtech/CA/certs/users/adejoux.key:
And use the generated key to create a certificate:
openssl req -new -key /data/djouxtech/CA/certs/users/adejoux.key \
-out /data/djouxtech/CA/certs/users/adejoux.csr \
-config /data/djouxtech/CA/openssl.cnf

Enter pass phrase for /data/djouxtech/CA/certs/users/adejoux.key:
You are about to be asked to enter information that will be incorporated
into your certificate request.
What you are about to enter is what is called a Distinguished Name or a DN.
There are quite a few fields but you can leave some blank
For some fields there will be a default value,
If you enter '.', the field will be left blank.
-----
Country Name (2 letter code) [AU]:FR
State or Province Name (full name) [Some-State]:
Locality Name (eg, city) []:Paris
Organization Name (eg, company) [Internet Widgits Pty Ltd]:djouxtech.net
Organizational Unit Name (eg, section) []:
Common Name (e.g. server FQDN or YOUR name) []:Alain Dejoux
Email Address []:adejoux@djouxtech.net

Please enter the following 'extra' attributes
to be sent with your certificate request
A challenge password []:
An optional company name []:
The main difference is now. We will use the Certificate Authority to authentify this user.
openssl x509 -req -days 3560 -in /data/djouxtech/CA/certs/users/adejoux.csr \
 -CA /data/djouxtech/CA/certs/cacert.pem \
 -CAkey /data/djouxtech/CA/private/cakey.pem \
 -CAserial /data/djouxtech/CA/serial \
 -CAcreateserial \
 -out /data/djouxtech/CA/certs/users/adejoux.crt \
 -config /data/djouxtech/CA/openssl.cnf

 Signature ok
subject=/C=FR/ST=Some-State/L=Paris/O=djouxtech.net/CN=Alain Dejoux/emailAddress=adejoux@djouxtech.net
Getting CA Private Key
Enter pass phrase for /data/djouxtech/CA/private/cakey.pem:
After that, we have a certificate for our user authenticated and signed by our CA. We need to transfer it along the user’s key to the end user. For that, we export them in a format called PKCS#12.
openssl pkcs12 -export -clcerts -in /data/djouxtech/CA/certs/users/adejoux.crt \
 -inkey /data/djouxtech/CA/certs/users/adejoux.key \
 -out /data/djouxtech/CA/certs/users/adejoux.p12 \
 -config /data/djouxtech/CA/openssl.cnf

Enter pass phrase for /data/djouxtech/CA/certs/users/adejoux.key:
Enter Export Password:
Verifying - Enter Export Password:
The file adejoux.p12 is protected by password. It can be transferred safely to the end user.
NGINX configuration
Configuring NGINX to enable clinet certificate is straight-forward.
Three configuration options are used:
ssl_client_certificate /data/djouxtech/CA/certs/cacert.pem;
ssl_crl /data/djouxtech/CA/crl/ca.crl;
ssl_verify_client on;- ssl_client_certificate points on the CA’s root certificate.
- ssl_crl specify the Certificate Revocation list.
- ssl_verify_client enable the valid user’s certificate only mode.
For completeness, you can find below the full virtual server configuration:
server {
	listen 443;
	server_name log.djouxtech.net;
  access_log /var/log/nginx/graylog_access.log;
  error_log /var/log/nginx/graylog_error.log;

	index index.php index.html index.htm;
  server_tokens off;

	ssl on;
  ssl_certificate /etc/letsencrypt/live/log.djouxtech.net/fullchain.pem;
  ssl_certificate_key /etc/letsencrypt/live/log.djouxtech.net/privkey.pem;

  # user ssl certificate check
	ssl_client_certificate /data/djouxtech/CA/certs/cacert.pem;
  ssl_crl /data/djouxtech/CA/crl/ca.crl;
  ssl_verify_client on;

  ssl_stapling on;
  ssl_stapling_verify on;
  ssl_trusted_certificate /etc/letsencrypt/live/log.djouxtech.net/fullchain.pem;

  include /etc/nginx/ssl_params;
  location / {
    proxy_set_header        Host $host;
    proxy_set_header        X-Real-IP $remote_addr;
    proxy_set_header        X-Forwarded-For $proxy_add_x_forwarded_for;
    proxy_set_header        X-Forwarded-Proto $scheme;
		proxy_set_header        X-Graylog-Server-URL https://log.djouxtech.net/api;
    proxy_pass              http://127.0.0.1:9000/;
  }
}
browser configuration
Certificate Authority
When trying to connect on this web page without certificate, you will see this error message:
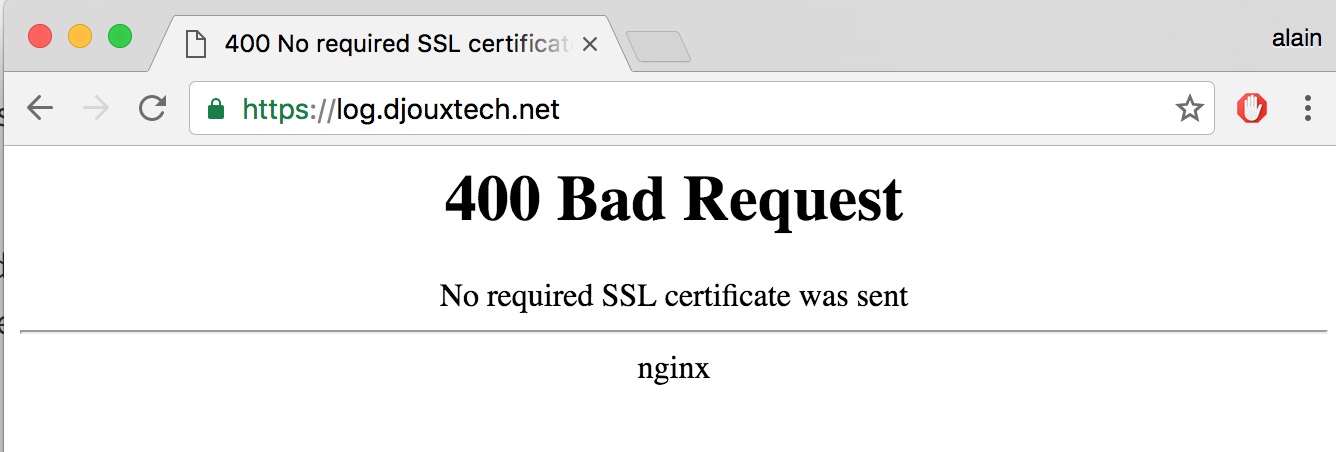
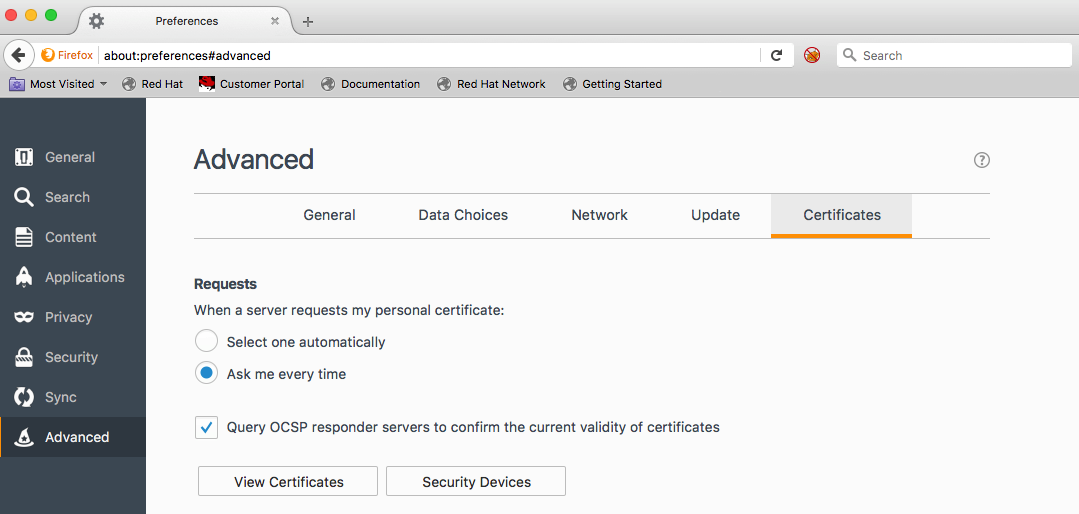
The first step is to add the Certificate Authority in Firefox to allows it to be recognized and approved. Go to preferences -> Advanced -> Certificates and click on View Certificates.
In Authorities click on import and download the Certificate Authority’s certificate.
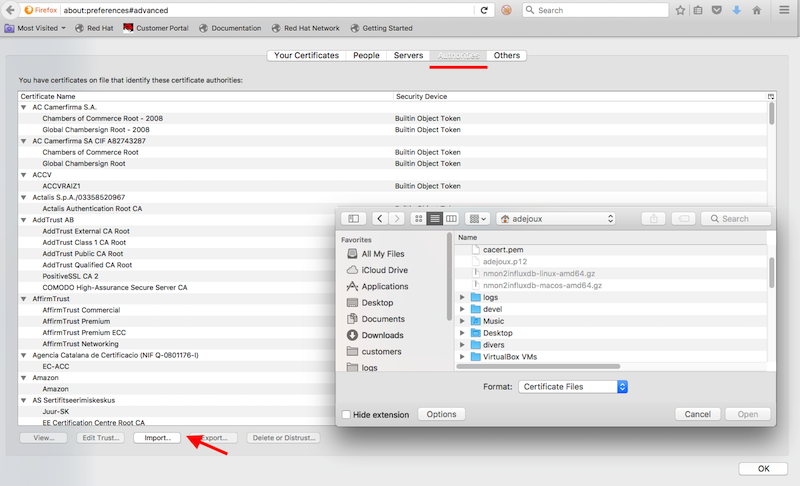
Authorize it to identify web site:
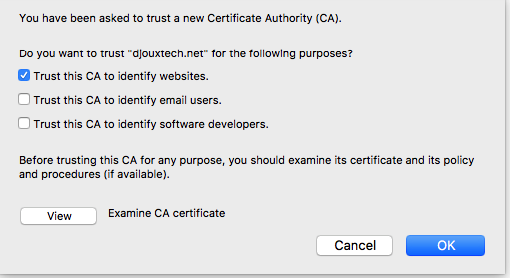
It will be listed with the others CA.

User’s certificate
It’s in the same Certificate menu under Your certificates section.
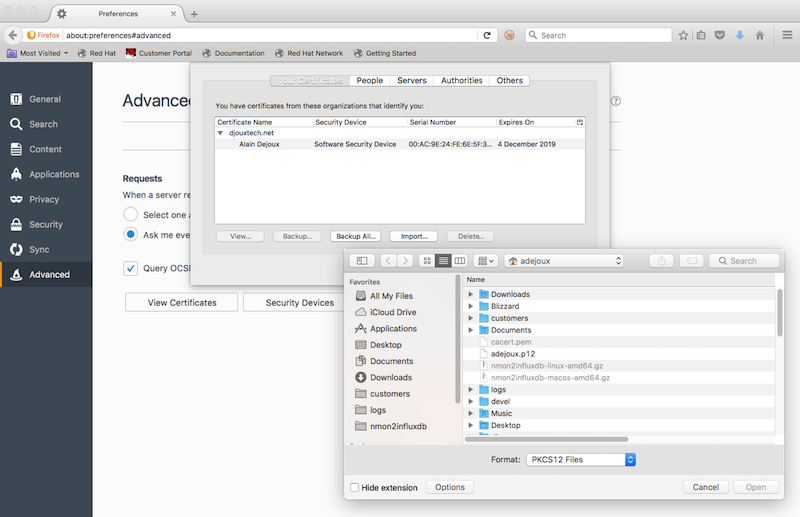
A password is required to import it:

And the cert is added:

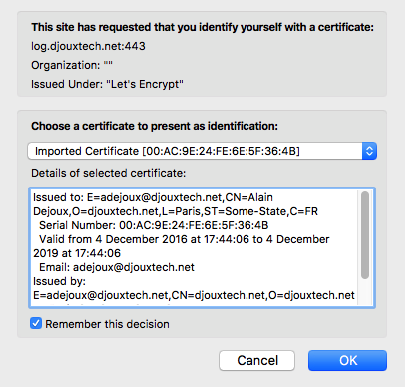
You will be automatically prompted to select the certificate when connecting on the web site.
wrap up
This solution is really neat. The setup is a little bit long but the result is really great. I am still keeping password authentication on the applications and I use docker to deploy them. So I think it’s a pretty good security setup. I use it for the kind of applications where I know I will connect from my laptop only. I will not say it’s unbreakable but it’s good enough for my small web site. :)